RSS Feed

‘Food and Cooking’ Category

  1. Simple Strawberry Jam

    April 27, 2011 by Daniora

    StrawberriesWe here at The Nerdly Home are all about making things from scratch whenever possible. That can be tough to do when things get busy. Fortunately, there are plenty of things that can be made ahead and stored for later. I’ve just started getting into canning, and I’ll admit that I haven’t quite gotten the hang of it. There always seems to be one little step that I forget and everything has to be stored in the fridge instead of on a shelf. I’m definitely improving, though.

    Since my canning skills are improving, I figured it was about time for me to start making things from scratch to put in the jars.  After going through the wonderful book Canning and Preserving with Ashley English (Homemade Living), I decided that her recipe for Strawberry Jam would probably be the simplest. In spite of the weather, it is spring.  Spring is the best time for strawberries. Just be sure that if you’re making anything with strawberries, be sure to get organic.  They cost a bit more, but strawberries are one of the dirty dozen foods that retain the most toxins from pesticides.

    Simple Strawberry Jam

    • 4 pints strawberries, hulled and sliced
    • 2 cups granulated sugar
    • 2 tablespoons bottled lemon juice


    1. Place two small plates in the freezer. These will be used later to test for gelling.

    2. In a large nonmetallic bowl, add the strawberries, sugar, and lemon juice; stir, cover loosely with a kitchen cloth, and set aside to macerate at room temperature for 2 hours.

    3. Sterilize 3 half-pint mason jars, lids, and screw rings. Fill a canner or large stockpot with water, and set over medium-high heat. Bring just to the boiling point. Place the lids in a small saucepan, fill with water, bring to a boil, turn off the heat, and set the pan aside.

    4. Transfer the strawberry mixture to a medium stainless-steel pot. Bring to a boil over medium-high heat and boil for 20-25 minutes, until the mixture begins to thicken. Stir frequently an watch the pot carefully to prevent to contents from boiling over. Skim off any foam that rises to the top.

    5. Test for gelling. Remove a plate from the freezer and spoon about 1 teaspoon of the strawberry mixture onto it. Place the plate back in the freezer and wait 2 minutes. Remove from the freezer and push the edge of the jam with your fingertip. If the jam has gelled properly, the surface will wrinkle a bit. If it fails to wrinkle, or is obviously still runny, boil the jam for 5 minutes longer, and then repeat the test.

    6. Place the hot, sterilized jars on top of a kitchen cloth on the counter. with the help of a canning funnel, ladle jam into the jars, reserving 1/4-inch headspace. Use a nonmetallic spatula to remove any trapped air bubbles, and wipe the rims clean with a damp cloth. Place the lids and screwbands, tightening only until fingertip-tight.

    7. Using a jar lifter, place the jars into the canner. Process for 10 minutes in a boiling bath.

    That’s it.  Simple ingredients and simple to make. The only major problem I had with making the jam was skimming off all the foam.  There was quite a bit of it and I really didn’t have a good tool for getting it all.  As a result, I wound up with some bits of foam in my jars compromising my canning.  So, all three jars went into the fridge.  I doubt the jam will be around long enough to risk spoiling.

    This jam is delicious.  I’m having a hard time not just grabbing the jar and a spoon and eating all of it. Because it doesn’t have any added pectin, it doesn’t set up quite as firm as commercially made jams.  Be sure to have a  napkin handy if you’re putting lots of this on your sandwich.  I’m looking forward to using it to make something tasty like danish or turnovers.


  2. Chicken Barley Corn Soup

    April 21, 2011 by Daniora

    We here at the Nerdly Home have been hit by one heck of a cold. As a result, posts have been delayed, and a large pot of chicken barley corn soup has been made. One of the fantastic things about this soup is that it can be easily adjusted to your personal tastes.  Want more vegetables? Add them.  Want to use left over chicken? Go ahead.  As a result, I won’t really put amounts on things unless they matter.

    Chicken Barley Corn Soup

    • 1 lb chicken, cut into bite sized pieces (can be leftovers)
    • garlic, minced
    • onion, finely diced
    • celery, finely diced
    • carrots, finely diced
    • 64oz (2 boxes) chicken or vegetable broth
    • 1/2c pearled barley
    • 1 can creamed corn
    • 1 bag frozen sweet corn
    • 1/2tsp-ish cumin
    • 1/2tsp-ish coriander


    1. In a large pot or dutch oven, heat a glug of olive oil.  Add garlic.  If using leftover chicken, skip this step. Add raw chicken until thoroughly cooked. I like to add some of the cumin and coriander at this point to help give the chicken some extra flavor, along with a bit of salt and pepper. When the chicken is cooked through, remove from the pot and set aside.

    2. Add a bit more olive oil if necessary and add the onion, celery, and carrots.  Add a small pinch of salt to help sweat the onions. Cook until softened, about 5 – 10 minutes.

    3. Add the cooked chicken and the rest of the ingredients back to the pot and bring just to the boil.

    4. Lower the heat and simmer until the barley is cooked, about 30-45 minutes.

    I find this soup is really fantastic with a nice warm piece of buttered Italian bread.  The soup can be made in large batches and is great for keeping in the freezer.


  3. Planting potatoes: Part 1

    April 15, 2011 by Daniora

    I’ve grown up with gardening.  My parents have always had a garden.  I have fond memories of visiting my grandmother and picking vegetables in her huge garden or hiding in the greenhouse.  I’ve eaten green beans right off the vine, picked raspberries off of prickly bushes, and emptied pea pods. One thing that still fascinates me is growing potatoes.Potatoes

    I’m pretty sure we’ve all had potatoes slip to the back of the cabinet to be found later with large sprouts growing from the eyes.  The fact that this will lead to more potatoes boggles my mind.  We’ve never planted potatoes before, so this year I’ve decided to try it myself.

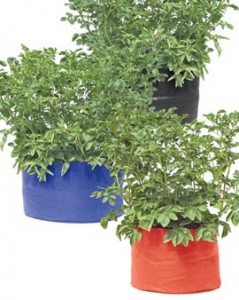
    Grow bags with potato plantsThe one problem is that sunny garden space is at a premium in our yard, so I have to find a way to grow them without taking up areas designated for other plants.  Fortunately, I got this article from Urban Sustainable Living newsletter. They recommend a method of growing potatoes in a grow bag.  Gardener’s Supply Company sells grow bags for a variety of different vegetables, including potatoes.  The beautiful thing about this method is that they can be put anywhere (and moved if they have to be). The bags come in multiple colors and sizes.  I’ve got a small poppy orange colored one picked out for myself.

    The other ingredient that I need to locate for this project is seed potatoes.  Yes, you can grow potatoes from ones that you buy at the grocery store, however things I’ve read say that getting actual seed potatoes will increase your likelihood of success.  As success is something we here at the Nerdly Home are rather fond of, that’s the route I’ll be going.  Unfortunately, the seed potatoes at Gardener’s Supply haven’t gotten the best reviews. I will be turning, instead, to one of my other favorite resources.  Jung Seeds and Plants.  In our house, the arrival of the Jung catalog is the real sign that spring is coming.

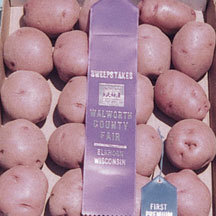
    Red seed potatoesFor my potato experiment, I’m going to go with the red seed potatoes. These have gotten high reviews and have apparently won awards at county fairs in Wisconsin.  I really like red potatoes for their versatility; I probably use them more than any other type of potato.  They are my favorite for roasting, using in soups, and for potato salad. Also, because of their smaller size, I think I’ll be able to get a higher potato yield from a smaller area.

    I’m really excited about this project and I can’t wait to see how everything goes.  I will certainly be posting updates on the potato progress as the season goes on.


  4. Kitchen tools I can’t live without.

    April 6, 2011 by Daniora

    It doesn’t matter what you’re trying to do; if you don’t have the proper tools, you’re going to have a hard time getting really great results.  For me this is especially true in the kitchen.  The basics are important, like a good knife and a sturdy set of pans, but these are a few of the extra things that I now find I can’t live without.

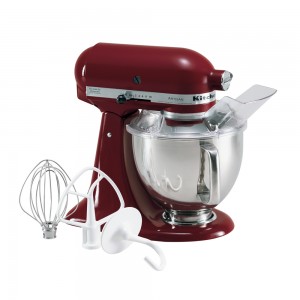
    Kitchenaid Stand MixerStand Mixer

    Sure, you can cook without a stand mixer.  Be warned, though, once you start using one, you just can’t go back. We’ve had a KitchenAid stand mixer for as long as I can remember. I’m fairly certain that my mother’s mixer, still in great working order, is older than I am.  The standard attachments that come with it are a mixing blade, a dough hook, and a whisk.  With those three you can do pretty much anything. For me, it’s a must for cookies and bread.  I use it for fresh whipped cream and homemade marshmallows.  My mother even uses hers to mix up meat and spices for meatloaf or hamburgers

    For the KitchenAid mixers, there are lots of bonus attachments you can get too.  I’ve got the ice cream maker and the slicer.  There is also a pasta maker, sausage stuffer, ravioli cutter.  It seems like new ways to use my mixer are coming out all the time.  A stand mixer may be a fairly significant initial investment for your kitchen, but if you plan on doing any large amount of cooking, I highly recommend picking one up.

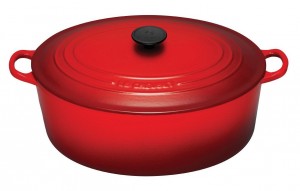
    Dutch OvenLe Crueset Dutch Oven

    This is my go to pot for soups and stews.  It’s a heavy duty cast iron pot with an enamel coating inside and out.  It’s oven safe which makes it perfect for stews that need to bake in the oven. The enamel makes it really easy to clean even when food gets burnt onto the bottom. There are a large variety of sizes all the way down to little personal sized pots (someday I will figure out a use for those).  I’ve got the 5.5 quart size which I find to be pretty perfect for just about everything I make.  I’ll probably pick up a slightly smaller one sometime for those few occasions when the 5.5 quart was really too big. There are tons of designer colors if you’re one of those people who likes all their kitchen stuff to match.

    Le Crueset is the most common brand, though there are plenty of others out there.  They can be really pricey at kitchen stores. I’ve gotten mine at Home Goods.  They’ve been factory seconds, but there’s really not a whole lot wrong with them.  The one I currently use had a little bubble in the enamel on the outside.  It was just enough for the factory to send it to the discount store, but certainly not anything that affects the cooking at all.  If you do pick one up at a discount, just give it a good check to make sure that the inside is up to snuff.  If it is, you should be all set.

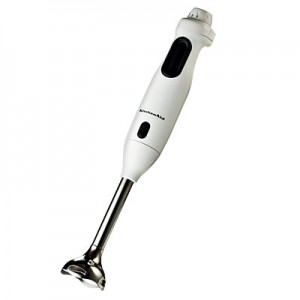
    Immersion BlenderImmersion Blender

    This is a fairly new addition to my kitchen arsenal.  I don’t use it all that frequently, but when I do, I’m very glad to have it; there is no other tool that would get the job done as quickly and easily.  The immersion blender is basically the blade from a standard blender on the end of a stick instead of at the bottom of a carafe. I most often use mine when making soups to take them from chunky to a little creamier.  Instead of having to ladle hot soup into a blender in batches, I can just use the immersion blender on the whole pot and get the perfect texture in no time.  It give you a lot more control over just how much you blend.  If you were making something really smooth, like tomato soup, I think an immersion blender may not be the best choice. However, for things like thickening up lentil soup, it does the job perfectly.

    Some versions come with other attachments, like whisks or bowls so that they can be used in place of a larger food processor.  They’re not particularly expensive and don’t take up much space, so I think they’re a pretty great addition to any kitchen.

    Pepper GrinderPepper Grinder

    This might seem like an odd addition to the list, but I can’t stress the importance of fresh ground pepper.  All spices are better when they are ground fresh when you need them.  This isn’t always the most convenient thing.  However, pepper is so important when cooking that it is imperative that you have a good pepper grinder filled with high quality peppercorns.

    The most important factor when picking out a grinder is to make sure that it grinds evenly.  If it is also adjustable for a coarser or finer grind, that’s great too.  As long as all the pieces are roughly the same size, you’re in good shape.  I actually prefer a grinder with a smaller reservoir for peppercorns. It means that you’ll be refilling it more frequently which keeps the pepper fresher.  We keep two grinders in the house; one is for the kitchen, the other for the dining table.  It keeps us from having to find the pepper every time we need it.

    This is a brief list of the tools that will always have a home in my kitchen.  I use them often and they make cooking so much easier and more enjoyable.